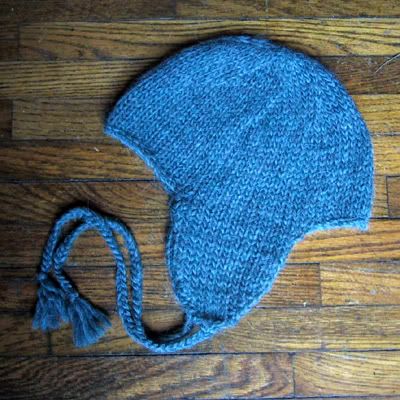
Basic Earflap Hat
Otherwise known as FO #93. I had a skein of Pastaza in my stash that I didn't know what to do with, and I'd toyed with knitting hats to send to this program in the fall. I relied heavily on this pattern when I started knitting earflap hats, but I changed up a few things and rarely use a pattern any more....but I wrote this one down as I knit it up.
(Note that in the pictured hat, the earflaps are 4" and the main part of the hat is 4". I changed the pattern to reflect what I discovered when finished -- the flaps are a bit too long, and the length would be better used as part of the hat proper.)
Supplies:
Ear Flaps
CO 7 stitches.
Row 1: K1, P to last stitch, K1.
Row 2: K1, Kfb, K to last 2 stitches, Kfb, K1.
Repeat these two rows until there are 15 stitches on the needles.
Knit straight until piece measures 3.5".
Cut yarn, leaving a 12" tail, and leave the earflap on its DPN.
Repeat for second ear flap.
Hat
Using a cable cast on, CO 10 stitches on the circular needle. Knit the 15 stitches from first ear flap, then CO 24 stitches. K15 from second ear flap, then CO 10.
(Confused? Here's a video that shows what I'm talking about!)
Join, being careful not to twist stitches, place marker and begin knitting in the round. As you knit around this first row, you'll notice four gaps, on either side of each ear flap. When you get to those, K2tog to close them up. At the end of the round, you should have 70 stitches on the needles.
Continue knitting all rounds until hat measures 4.5" from the cast-on row (or 8" from the beginning of the ear flaps). Then begin the decreases as follows, switching to DPNs or two circs (video here) when the diameter of the hat is too small for your circular needle:
(Decrease) Row 1: *K8, K2tog*
Row 2: K all sts
(Decrease) row 3: *K7, K2tog*
Row 4: K all sts
(Decrease) row 5: *K6, K2tog*
Row 6: K all sts
Decrease in this manner until there are 35 sts on the needles.
Then decrease in the same manner, omitting the "k all sts" rows, until there are 7 sts remaining.
Pull yarn through the last 7 sts with a tapestry needle, pull through to inside and weave in end.
Finishing
Weave in all ends. (I like to leave the tails where I ended the earflaps long so that I can use them to tighten up of otherwise correct anything that looks wonky around the earflap join area.)
There are a few ways you can add straps -- pick up 3-4 sts and knit in garter stitch or seed stitch until desired length. OR pick up 3-4 stitches and knit i-cord until desired length. OR, thread through three long pieces of yarn and braid the double-strands until desired length, then tie off and trim.
Block and lay flat to dry.
(Note that in the pictured hat, the earflaps are 4" and the main part of the hat is 4". I changed the pattern to reflect what I discovered when finished -- the flaps are a bit too long, and the length would be better used as part of the hat proper.)
Supplies:
- about 100g of heavy worsted weight yarn (I used Cascade Pastaza, but you can use any yarn that knits to gauge)
- at least three DPNs and a matching 16" circular needle (I used US8, but again, you can use whatever knits to gauge)
- one stitch marker
Ear Flaps
CO 7 stitches.
Row 1: K1, P to last stitch, K1.
Row 2: K1, Kfb, K to last 2 stitches, Kfb, K1.
Repeat these two rows until there are 15 stitches on the needles.
Knit straight until piece measures 3.5".
Cut yarn, leaving a 12" tail, and leave the earflap on its DPN.
Repeat for second ear flap.
Hat
Using a cable cast on, CO 10 stitches on the circular needle. Knit the 15 stitches from first ear flap, then CO 24 stitches. K15 from second ear flap, then CO 10.
(Confused? Here's a video that shows what I'm talking about!)
Join, being careful not to twist stitches, place marker and begin knitting in the round. As you knit around this first row, you'll notice four gaps, on either side of each ear flap. When you get to those, K2tog to close them up. At the end of the round, you should have 70 stitches on the needles.
Continue knitting all rounds until hat measures 4.5" from the cast-on row (or 8" from the beginning of the ear flaps). Then begin the decreases as follows, switching to DPNs or two circs (video here) when the diameter of the hat is too small for your circular needle:
(Decrease) Row 1: *K8, K2tog*
Row 2: K all sts
(Decrease) row 3: *K7, K2tog*
Row 4: K all sts
(Decrease) row 5: *K6, K2tog*
Row 6: K all sts
Decrease in this manner until there are 35 sts on the needles.
Then decrease in the same manner, omitting the "k all sts" rows, until there are 7 sts remaining.
Pull yarn through the last 7 sts with a tapestry needle, pull through to inside and weave in end.
Finishing
Weave in all ends. (I like to leave the tails where I ended the earflaps long so that I can use them to tighten up of otherwise correct anything that looks wonky around the earflap join area.)
There are a few ways you can add straps -- pick up 3-4 sts and knit in garter stitch or seed stitch until desired length. OR pick up 3-4 stitches and knit i-cord until desired length. OR, thread through three long pieces of yarn and braid the double-strands until desired length, then tie off and trim.
Block and lay flat to dry.
posted by Julie at 5:50 PM
![]()

54 Comments:
That's really cute! What size does it fit?
It fits me....average adult female, with about a 20" head. For a man you could make it a little taller and add 7 stitches and start the decreases at *k9, k2tog* ...I think :)
Too cute...love it.
Looks wonderful - thanks for sharing the pattern
Hey Julie,
Would you consider allowing the Windy City Knitting Guild to distribute and/or publish your pattern in our monthly newsletter? We're contributing to several charitable organizations this September, one of which is the Adopt a Native Elder program, and your hat design is absolutely perfect!
:)
Nicole, I emailed you (at least I think I did...or some other Nicole from WCKG is going, "huh??") but I thought I'd post here just in case...sure, that would be fine!
what is kfb?
kfb = knit into the front and back of the stitch (bar increase). Here is a video showing this increase: kf&b
LOVE YOUR HAT.I'm a beginner and with the help of your pattern I think I will try my hand at a hat. Thanks!
Thanks for the cute pattern...Just what I have been looking for!!
I am curious as to what the term " two circs " mean instead of the use of DPN's when you start the decrease ??
Would love to have any excuse not to use DPN's......Not my forte!!!!!
MO
Thanks Julie~
Perfect for my snowboarding kids. Appreciate you sharing your talent!
Hi Julie
I'm a beginner, and am in the UK, but I'm going to give this a go!
I had a look at the video and wanted to say - BRILLIANT! So clear, and does what a book just can't do. Now I want to know if you know of any 'how to' crochet videos online? I just can't get it from the books ...
Em
Hi Em, unfortunately I can't recommend any crochet sites that come close to knittinghelp. I've looked and the ones I've found are too fast for me to learn from.
Amy (KH) did reserve the domain "crochethelp.com" with the intention of providing the same kind of instructional videos, but the knitting part really took off and takes up a huge amount of her time and resources.
trying to make this, but i'm confused on this
Decrease Row 1: *K8, K2tog*
Decrease Row 2: K all sts
Repeat these two rows until there are 35 sts on the needles.
Then decrease in the same manner until there are 7 sts remaining.
Pull yarn through th elast 7 sts with a tapestry needle, pull through to inside and weave in end.
Why do you stop at 35, but then say continue in this manner? Do I keep with Decrease Row 1 and 2 until I'm at 7 stitches?
ohmygoodness!!
Thanks for calling my attentio to this very obvious and dumb error! I added the correction in red.
Your earflap hat is just the thing I've been searching for! It has such a nice look to it, and very professional. And, I've looked at a lot of patterns, too!
I am thinking of trying this pattern in a sock-weight type yarn: one of the self-striping varieties. Have you ever knit one in this gauge?
Can this pattern be used for charity knitting? I often knit caps for local shelters, etc.
Thanks for this fabulous pattern!
Yes, it can absolutely be used for charity knitting!
This comment has been removed by a blog administrator.
OH, thank-you, thank-you! I have been looking for the PERFECT earflap hat for a long time...this is IT! One question, you mentioned that the pattern was modified to make the earflaps shorter and the main hat longer, how long will the flaps end up when I knit it! Thanks so much!
Per the pattern, the flaps are 3.5" and the hat is 4.5" at the beginning of the decreases. Then the decrease rows add about another 2"...so, about 10" from the base of the earflaps to the top of the hat.
Somehow, after I knit this hat with the pattern provided, I got a "nipple" at the top...I can work with it, but it's not what I expected. I will have to figure out how to avoid this next time....Thanks for a great start!
claire - i got the same nipple when i knit it. i ironed it out, but still looks a little rounded up top.
I made this hat for a baby by making the hat bit beore it came in only 3.5 inches instead of 4.5 and when I got to 15 stitches at the top, I knitted 2 then knitted 2 together to bring it in faster. I also had it inside out when I pulled it in at the top and the nipple thing has come out on the inside. I loved this pattern as I managed to make it without any major mishaps (which is very unusual for me as I am not very good at knittintg)but it still looked good. Thanks for posting it!
Fabulous!
I just used this pattern to make my very first thing that wasn't a scarf and it worked out wonderfully (although I had a nipple too, which I just put on the inside and sewed across the top.
Thank you ten times over, I can't wait to wear it fishing tonight!
quick question...
im going to turn this into a fair isle, and i was wondering
the place where the stiches come together (between the two 10 cast ons)
is this the front or the back?
thanks
The place where you join and start working in the round is the back of the hat.
i'm being thick, what do i do when i cast on for the hat? i don't understand how i get the ear flap on - do i knit it to the 10 stiches i cast on? or what? so confused but i love the hat
Cute hat,can't wait to try it! Thanks for sharing it with the masses.
anonymous and Barb, I thin kit might be easier to explain with a photo or two. Give me a few hours and I will get a post up the shows what I'm talking about in addition to explaining it! :)
Okay...video up at YouTube! I *heart* the Internet! :)
http://www.youtube.com/watch?v=IJ0i6XWFwa8
Thank you so much for the video. It is beautiful. I'm gonna use that pattern. It is beautiful too.
Thanks again.
I am about to knit your hat for a 11 year old boy with a larger head but I have a medium worsted weight yarn. Your pattern calls for heavy worsted weight. Will two strands of medium worsted held together work? Thanks
Kristen, I think worsted doubled would be too heavy...do you know his head measurement? Depending on your gauge it might just be simpler decrease the needle size and add another 10 sts -- so CO 12, knit earflap, CO 30, knit earflap, CO 12, then join and begin knitting in the round. After the four-stitch decrease to close up the gaps you would have 80 sts on the needles. At 4 sts/inch that would put you at 20" around.
Did that make any sense? :)
Yes, that makes sense thanks alot!
I love this hat! I made it in a self-striping worsted weight in purples, plums and browns. I added braided tassles in the front, but I made them shorter and chunkier (6 strands instead of 3). I also plan to add a little tassle to the very top!
I also ended up with a nipple at first, so I undid the last 4 or 5 rows and toggled together about 22 stitches.
I have had many requests from friends to receive this hat for Christmas, I will be very busy this month! I like that it's a hat that works for both a male or female.
Thanks for sharing such a simple but attractive pattern!
Hi,
Thanks for your generosity in sharing your pattern. Can you advise me how many stitches to use for a toddler whose head is 18 1/2 inches at the widest part. I will be using a regular worsted weight yarn and whatever size needle you suggest. I get 4.5 sts to the inch with a #8 circular. Thank so much.
Judi
Hi Judi, if you look about three comments above yours...follow those directions. With your gauge that puts the finished hat at about 17.75 inches around which should be good for an 18.5" head. Good luck!
I tried this pattern, but I added a bit of fairisle and a blanket stitch edging. also, i kitchenered the top to avoid the previously mentioned "nipple." I really liked this pattern! I made the hat for a friend, I'm sure she will also enjoy it.
(pictures here)
julie,
once you are done with knitting on the flaps, which side should the yarn be on the left needle or the right needle and how do we know if we should pearl or knit.
hope u can help.
kanan, it doens't really matter, but I usually end with a knit row, so the long tail is hanging off the left side of the earflap. Have you watched the video? I think it's really helpful :)
julie, thanks,
one more question, since i am a beginner....:)i started decreasing the rows. so for the first row after decreasing i ended up with 63 stiches from initial 70 stiches.. then i knitted it around and then decreased again and ended up with 57 stiches. do i keep doing this.. it seems like its going to be while before i get to 35 stiches and if i did the math correctly or incorrectly i end up with 36 stiches. i counted and it would be 70, 63, 57, 52, 47, 43, 39, 36. can you please guide me??? i am going to look at the video again..
kanan, on each decrease row you decrease 7 stitches -- that number never changes -- so it goes like this: at the end of the 1st dec row: 63; 2nd dec: 56; 3rd dec: 49; 4th dec: 42; 5th dec: 35.
HOLY COW, you think that by now I would have found all of the errors in my notation, but I guess not!!!
The decrease rows should be graduated...i.e. the first decrease row is *K8, K2tog* then the next one *K7, K2tog* and so on.
GAH!!
Hey Julie! Just wanted to stop by and say hi! I am your KH Sockentine Swap Spoiler! I have finally chosen yarn and a pattern. I look forward to knitting these socks for you!
Sockentine Pal :)
thanks julie..
can't wait to finish it..
CO 7 stitches.
Row 1: K1, P to last stitch, K1.
Row 2: K1, Kfb, Kto last 2 stitches, Kfb, K1.
Repeat these two rows until there are 15 stitches on the needles.
I am confused about the earflaps...
on row 2, you knit one stitch, then increase with the kfb, and then knit the previous stitches together? or the final two stitches together?
Thank you.
Row 2: K1, Kfb, Kto last 2 stitches, Kfb, K1.
Sorry about that Angela, those abbreviations can get a little tricky, huh?
In longhand:
Knit one, Kfb (knit in the front and back of the stitch, increasing one), Knit all the way across the row until you get to the last two stitches, Kfb, Knit one.
So, in effect:
R2: *K1, Kfb, K3, Kfb, K1*
R4: *K1, Kfb, K5, Kfb, K1*
R6: *K1, Kfb, K7, Kfb, K1*
R8: *K1, Kfb, K9, Kfb, K1*
Julie!!! I was just doing a search for a hat pattern for DS, and LOOK ... I found YOU!! :ha ha ha: It just cracks me up when I find someone I know whilst doing a random search ... unfortunately, DS won't wear an earflap hat. :-| {sigh}
I hope you all are doing well! :muah:
I am a total beginner - so this is a bit challenging for me. What am I to do with the curling around the edges because of the knitting round and round???
Thanks Michelle
Michelle, the earflaps only curl a tiny bit (the one-stitch garter edge helps there), and I haven't had any problems with curling around the main part of the hat, personally. I do use natural fibers for the most part, and block them when I'm done. My daughters have been wearing their merino wool earflap hats for well over a year now with no curling issues :)
If you're using acrylic or a blend that doesn't lend itself to blocking, you could always finish the hat, then before adding the ties, pick up stitches all around the edge of the hat, then bind them off. That's a very simple edging that helps things to lie flat, in my experience.
Hey, I was wondering if the top of this was stretchy. My daughter has a horseshoe cable earflap hat and it's fit her forever because the top is so stretchy. I keep meaning to ask her great-grandmother for the pattern and I keep forgetting ....
Thanks!
This pattern is great! Thanks for the help. Just one question--i'm using acrylic yarn that's hard to block. Will the non-earflap parts of the hat curl if I don't do some sort of stitch to prevent that?
Hi I'm also a beginner and I love the pattern but on the decrease do I start with 8 decrease and continue on to 7,6,5 and so on or what, thanks in advance.
Hi figured out the decrease but when I put on the ear flaps I get bumps on the outside of the hat and flat on the inside can anyone help me I don't want to purl the whole hat. I've ripped it out so many times.
Post a Comment
<< Home